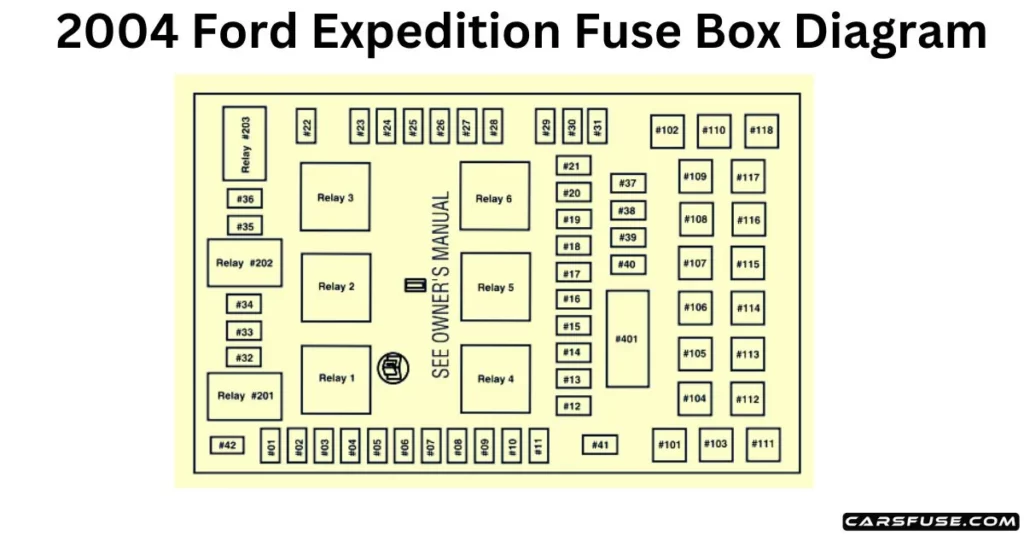
| Fuse/RelayLocation | Fuse AmpRating | Passenger Compartment FusePanel Description |
| 1 | 10A* | Run/Accessory – Front wiper motor, Instrument cluster, Rear wiper motor, Tire Pressure Monitor System (TPMS) module |
| 2 | 20A* | Turn signal/Hazard flasher, Stoplamp switch, AdvanceTrac stop lamps relay (if equipped), Stoplamps, Center high-mount stop light (CHMSL), Turn signal lamps |
| 3 | 7.5A* | Power mirror switch, Power mirrors (non-memory), Driver seat switch (memory), Memory module (logic power) |
| 4 | 15A* | DVD player, Rear seat audio controls, CDDJ (navigation radio) |
| 5 | 7.5A* | Powertrain Control Module (PCM) (KA power), Speed control deactivation switch, Manual climate control mode switch, Stoplamp switch, Brake-shift interlock (BSI) solenoid, EATC control head, Body Security Module (BSM) (KA power), Speed control servo, 3rd-row seat relay coils, SecuriLock LED |
| 6 | 15A* | Headlamp switch (park lamps and switch backlight feed), Parklamps, License plate lamps, Foglamp relay coil, Trailer tow electric brake controller (illumination), BSM (auto lamp, park lamps)Foglamp indicator |
| 7 | 7.5A* | Radio (start signal) |
| 8 | 10A* | Rear window defroster switch, Rear window defroster indicator (climate control head), Heated outside mirrors |
| 9 | 15A* | Fuel pump relay, Fuel pump shut-off switch, Fuel pump motor |
| 10 | 20A* | Trailer tow back-up lamps relay, Trailer tow 7–wire connector (back-up lamps), Trailer tow park lamp relay, Trailer tow 7– and 4–pin connectors (park lamps) |
| 11 | 10A* | A/C compressor clutch relay, A/C compressor clutch solenoid, Air suspension compressor relay, 4×4 Integrated Wheel Ends (IWE) solenoid |
| 12 | 10A* | Speed control servo, Speed control relay |
| 13 | 10A* | Manual climate control mode switch, Rear window defroster relay coil, A/C refrigerant containment switch, A/C compressor thermistor, DEATC control head, DEATC solenoids, DEATC blower control, Trailer tow battery charge relay coil |
| 14 | 10A* | Daytime Running Lamps (DRL) ignition relay coil, DigitalTransmission Range Sensor (DTRS) back-up lamps, Trailer tow backup lamps relay coil, Electrochromatic mirror, Navigation radio, Manual A/C blend door actuator |
| 15 | 5A* | AdvanceTrac switch, Instrument cluster (Run/Start feed) |
| 16 | 10A* | ABS/AdvanceTrac module(Run/Start feed) |
| 17 | 15A* | Foglamps |
| 18 | 10A* | Auxiliary A/C temperature blend door actuator, Auxiliary A/C front auxiliary control, Turn signal flasher, Electrochromatic mirror, Auxiliary mode motor, Climate controlled seat modules |
| 19 | 10A* | Restraints Control Module (RCM) |
| 20 | 30A* | Air suspension module (air spring solenoids and height sensors), 4×4 module |
| 21 | 15A* | Instrument cluster (B+), Interior(courtesy) lamps, Puddle lamps(outside mirrors), Tire Pressure Monitoring System (TPMS) module |
| 22 | 10A* | Moonroof switch illumination, Radio (delayed accessory feed), Flip window switch, Flip window motors, EHAM antenna amplifier(navigation radio) |
| 23 | 10A* | RH low beam |
| 24 | 15A* | Interior demand lamps (front map/dome lamp, 2nd-row dome/map lamp, glove compartment lamp, cargo lamp, roof rail lamps, vanity mirror lamps), Battery saver relay coil, Battery saver relay power |
| 25 | 10A* | LH low beam |
| 26 | 20A* | Horn relay, Horns |
| 27 | 5A* | Compass module, Reverse sensing system module, Brake shift interlock solenoid, Overdrive cancel switch, Air suspension module (Run/Start sense) |
| 28 | 5A* | PCM relay coil, Speed control relay coil, SecuriLock transceiver |
| 29 | 30A* | Trailer tow electric brake controller, Trailer tow 7–wire connector (electric brake) |
| 30 | 30A* | BSM (door locks, liftgate glass release relay), Liftgate glass release motor, Door/Liftgate lock motors |
| 31 | 20A* | Radio (B+), Subwoofer |
| 32 | 15A* | Catalyst Monitor Sensors (CMS), Transmission solenoids |
| 33 | 10A* | Canister vent solenoid, HEGO sensors, VMV solenoid, Intake Manifold Tuning Valve (IMTV-4.6L engine) solenoid, A/C compressor clutch relay coil, EGR vacuum regulator (EVR) solenoid |
| 34 | 15A* | PCM, Fuel injectors, Idle air control (IAC) solenoid, Mass AirFlow (MAF) sensor |
| 35 | 20A* | Instrument cluster high beam indicator, High beam headlamps |
| 36 | 10A* | Trailer tow right turn/stop lamps |
| 37 | 20A* | Cargo area powerpoint |
| 38 | 25A* | Rear wiper motor, Washer pump(rear window wash) |
| 39 | 20A* | Console power points (front and rear of console), Instrument panel powerpoint (bench seat) |
| 40 | 20A* | DRL relays, DRL foglamps, DRL headlamp relay coil, Headlamp switch (headlamps), Multifunction switch (flash-to-pass), BSM (auto lamp headlamps relay), High beam relay coil, Fuse 25 (LH low beam), Fuse 23 (RH low beam) |
| 41 | 20A* | Cigar lighter, OBD II diagnostic connector |
| 42 | 10A* | Trailer tow left turn/stop lamps |
| 101 | 30A** | Starter motor relay, Starter motor solenoid |
| 102 | 30A** | Ignition switch power |
| 103 | 30A** | ABS/AdvanceTrac module(pump motor) |
| 104 | 30A** | LH 3rd row seat relay, LH 3rd row seat switch, LH 3rd row seat motor |
| 105 | 30A** | Spare |
| 106 | 30A** | Trailer tow battery charge relay, Trailer tow 7–way connector(battery charge) |
| 107 | 30A** | Auxiliary A/C blower relay,Auxiliary A/C blower motor |
| 108 | 30A** | Passenger seat motor switch |
| 109 | 30A** | Driver seat motor switch(non-memory), Memory module, Power memory mirrors, Adjustable pedals switch, and motor |
| 110 | 30A** | Spare |
| 111 | 50A** | Air suspension compressor, Air suspension compressor relay |
| 112 | 30A** | ABS/AdvanceTrac module(valves) |
| 113 | 30A** | Front wiper motor, Washer pump(windshield wash) |
| 114 | 40A** | Rear window defroster relay, Rear window defroster grid, Heated mirrors (Fuse 8) |
| 115 | 30A** | 4×4 module, Transfer case shift motor |
| 116 | 40A** | Front blower motor relay, Front blower motor |
| 117 | 30A** | RH 3rd row seat relay, RH 3rd row seat switch, RH 3rd row seat motor |
| 118 | 30A** | Driver and passenger climate control seat module |
| 401 | 30A CB (circuit breaker) | Power windows (circuit breaker), Main window switch, Window motors, Window switches, Moonroof module |
| R01 | Starter relay | Starter motor solenoid |
| R02 | Delayed accessory relay | Fuse 22, CB 401, Power windows, Switch backlighting, Radio, Moonroof, Flip windows, Navigation antenna amplifier |
| R03 | Hi-beam relay | Fuse # 35, Hi-beam headlamps, Hi-beam indicator |
| R04 | Rear window defrost relay | Fuse 8 (heated mirrors), Rear window defroster, Heated outside mirrors, Rear window defroster indicator (climate control head) |
| R05 | Trailer tow battery charge relay | Trailer tow 7–wire connector(battery charge) |
| R06 | Front blower relay | Front blower motor |
| R201 | Trailer tow park lamp relay | Trailer tow 7–wire and 4–wire connectors (park lamps) |
| R202 | Foglamp relay | Front foglamps |
| R203 | PCM relay | Fuse 32, Fuse 33, Fuse 34, Fuel pump relay, PCM solenoids, and sensors |
| R301 | Trailer tow backup lamp relay | Trailer tow 7–wire connector(backup lamps) |
| R302 | Speed control relay | Speed control servo |
| R303 | Fuel pump relay | Fuel pump shut-off switch, PCM(fuel pump monitor), Fuel pump |
| R304 | Battery saver relay | Roof rail lamps, Vanity mirror lamps, Map/Dome lamp, Glove box lamp, Cargo area lamp, Outside mirror puddle lamps, Instrument cluster (interior lamps) |
| R305 | Horn relay | Dual note horn |