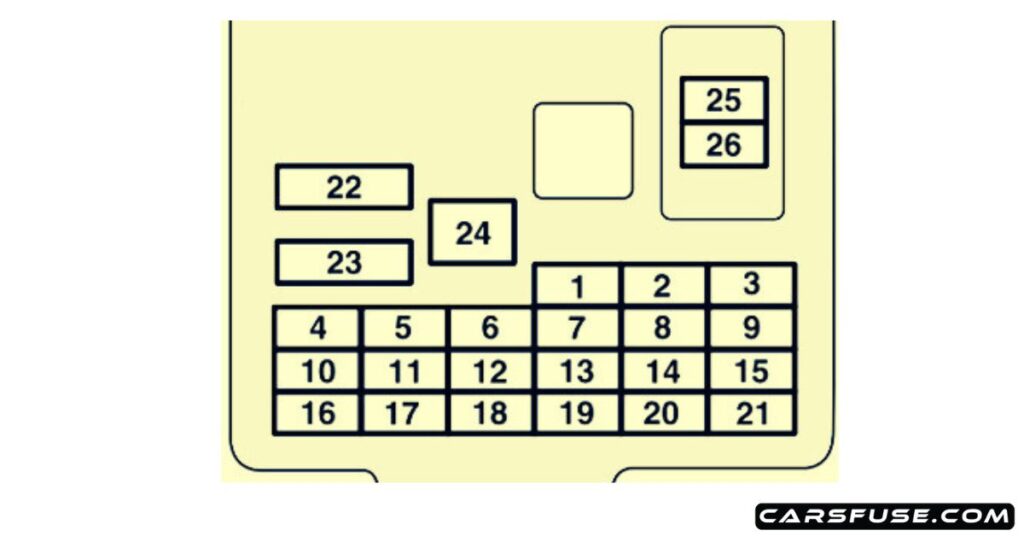
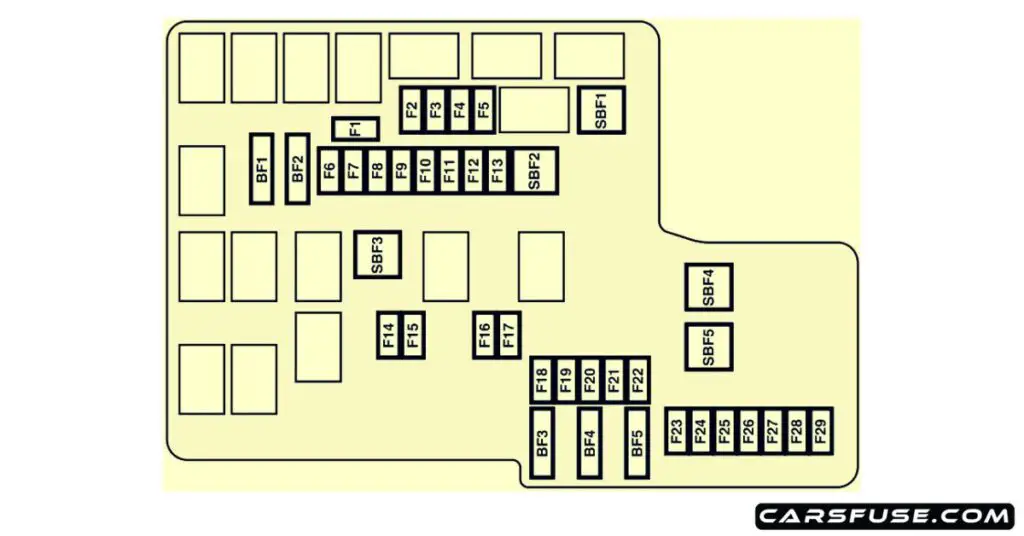
This blog post will provide a fuse box diagram for the Mitsubishi L200, model years 2020-2023. The fuse box diagram will show you the location of all fuses in the fuse box and the amperage rating of each fuse. This information can be helpful if you need to replace a fuse in your Mitsubishi L200.
The vehicle’s fuses are located in two fuse boxes. The interior fuse box is in the passenger side footwell, and the under-hood fuse box is in the engine compartment next to the battery.
Table of Contents
Passenger Compartment

| Fuse Number | Fuse Amp. Rating | Protected Components |
|---|---|---|
| 1 | 7.5A | Tail lamp (left) |
| 2 | 15A | Cigarette lighter/ Accessory socket |
| 3 | 10A | Ignition coil |
| 4 | 7.5A | Starter motor |
| 5 | 20A | Sunroof |
| 6 | 15A | Accessory socket |
| 7 | 7.5A | Tail lamp (right) |
| 8 | 7.5A | Outside rearview mirrors |
| 9 | 7.5A | Engine control unit |
| 10 | 7.5A | Control unit |
| 11 | 10A | Rear fog lamp |
| 12 | 15A | Central door lock |
| 13 | 15A | Room lamp |
| 14 | 15A | Rear window wiper |
| 15 | 10A | Gauge |
| 16 | 7.5A | Relay |
| 17 | 20A | Heated seat |
| 18 | 10A | Option |
| 19 | 7.5A | Heated door mirror |
| 20 | 20A | Windscreen wiper |
| 21 | 7.5A | Reversing lamps |
| 22 | 30A | Demister |
| 23 | 30A | Heater |
| 24 | 40A | Power seat |
| 25 | 10A | Radio |
| 26 | 20A | Electronic controlled unit |
Engine Compartment

| Fuse Number | Fuse Amp. Rating | Protected Components |
|---|---|---|
| SBF1 | 40A | Ignition switch |
| SBF2 | 30A | Electric window control |
| SBF3 | 40A | Power seat |
| SBF4 | 30A | Anti-lock brake system |
| SBF5 | 30A | Electric parking brake |
| BF1 | 30A | Audio system amp |
| BF2 | 30A | Rear air conditioning/ Rear circulator |
| BF3 | – | – |
| BF4 | 30A | DCDC( AUDIO) |
| BF5 | 30A | UREA SCR |
| F1 | 10A | NOX sensor |
| F2 | 20A | Engine |
| F3 | 15A | Fuel pump/ PMNOX sensor |
| F4 | 7.5A | IBS |
| F5 | 7.5A | Starter |
| F6 | 20A | Fuel line heater |
| F6 | 15A | ETV |
| F7 | 20A | Air conditioning |
| F8 | 20A | Automatic transmission |
| F9 | 10A | Daytime running lamps |
| F10 | 7.5A | Alternator |
| F11 | 7.5A | Engine control |
| F12 | 10A | Ignition coil |
| F13 | 15A | Front fog lamps |
| F14 | 10A | Headlamp high-beam (left) |
| F15 | 10A | Headlamp high-beam (right) |
| F16 | 15A | Headlamp low beam (left) |
| F17 | 15A | Headlamp low beam (right) |
| F18 | 15A | Steering heater |
| F19 | 15A | Hazard warning flasher |
| F20 | – | – |
| F21 | 20A | Radiator fan motor |
| F22 | 15A | Stop lamps (Brake lamps) |
| F23 | 20A | T/F |
| F24 | 20A | Rear heated seat |
| F25 | 20A | Headlamp washer |
| F26 | 20A | Security horn |
| F27 | 10A | Horn |
| F28 | – | – |
| F29 | 20A | AC inverter |
Conclusion
If you suspect that a fuse has blown in your Mitsubishi L200, you can check the fuse box diagram to see which fuse is responsible for the affected system. Once you have identified the fuse, you can remove it from the fuse box and inspect it for damage. If the fuse is blown, you will need to replace it with a fuse of the same amperage rating.
You can purchase replacement fuses at most auto parts stores. When replacing a fuse, it is important to use the correct amperage rating. Using a fuse with too high of an amperage rating could damage the electrical system while using a fuse with too low of an amperage rating could cause the fuse to blow again.
I hope this information is helpful. If you have any further questions, please feel free to leave a comment below.
Next Post: 2009-2013 Skoda Octavia Fuse Box Diagram
Tom Smith is a passionate car mechanic and automotive enthusiast, specializing in the intricate world of car fuse boxes. With years of hands-on experience under the hood, he has earned a reputation as a reliable expert in his field. As the founder and content creator of the popular blog website 'carsfuse.com,' Tom has dedicated himself to sharing his extensive knowledge of car fuse boxes and electrical systems with the world.

