
There’s a reason you still drive a 1980 Ford F-150. This beast is a workhorse built to last forever.
Although this truck performs best, it might have a day off. Almost every time a light goes dark or your radio cuts out, the culprit is a tiny, blown fuse.
With this article, I want you to forget digging through a dusty, 45-year-old manual, as I have put together the full guide to the 1980 Ford F-150 Fuse Box Diagram.
Table of Contents
Fuse Box Locations
First, let’s start with the location of the fuse box on the 1980 Ford F-150.
There are two fuse box layouts in your Ford F-150 from 1980. One is the basic, and the other power distribution box. The respective fuse layout with diagrams is displayed below.
Tip: Always disconnect the negative battery terminal before checking fuses to avoid short circuits.
Fuses and Location Diagram
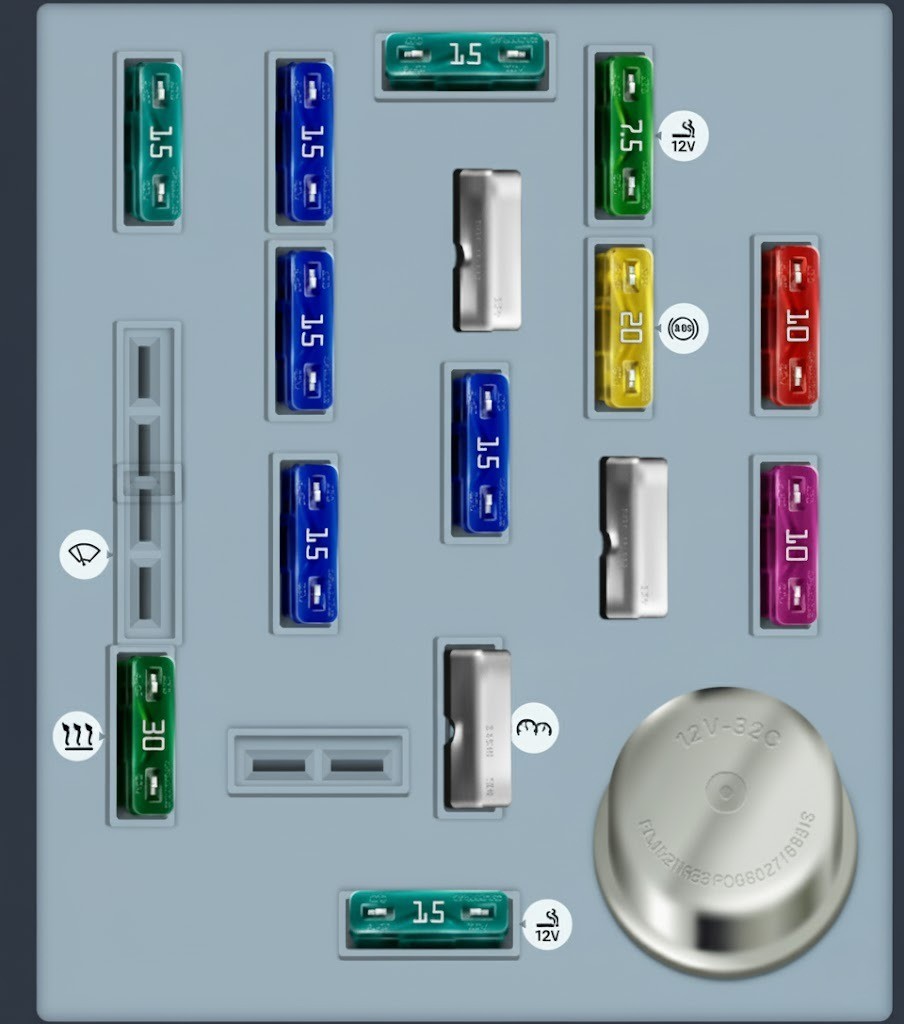
| Type | Position | Description |
|---|---|---|
| Fuse ATO 30A | 1 | Heater/AIR CONDITIONING Blower. |
| Fuse ATO | 2 | Wiper/Washer. |
| Fuse ATO 15A | 4 | Warning Buzzer/Chime Module: Exterior lamps; Instrument Illumination; Trailer exterior Lamps Relay. |
| Fuse ATO 15A | 6 | AIR CONDITIONING Clutch; (Diesel Aux. Fuel Selector). |
| Fuse ATO 15A | 7 | Turn Lamps; (Rear Window Defroster). |
| Fuse ATO 15A | 8 | Courtesy/Dome/Cargo Lamps; Electric Outside Mirrors; Radio/Clock Memory; Speedometer Memory; Warning Buzzer/Chime Module. |
| Fuse ATO 15A | 9 | Power Point |
| Fuse ATO 4A | 10 | Instrument Illumination |
| Fuse ATO 15A | 11 | Stop/Hazard Lamps; Anti-lock Brake Module Memory/Power (F-Series Only); Speed Control; Stop sense for: Electronic Engine Control; Anti-lock Brakes. |
| Circuit breaker ATO | 12 | Power Door Locks; Electronic Shift Motor 4WD; Power Lumber; (Tailgate Power Window: Key Switch). |
| Fuse ATO 15A | 13 | Stop/Hazard Lamps; Anti-lock Brake Module Memory/Power (F-Series Only);Speed Control; Stop sense for: Electronic Engine Control; Anti-lock Brakes. |
| Circuit breaker ATO | 14 | Power Windows; (Tailgate Power Window; Instrument Panel Switch). |
| Fuse ATO 20A | 15 | Anti-lock Brakes (F-Series only). |
| Fuse ATO 7.5A | 16 | Cigars Lighter |
| Fuse ATO 10A | 17 | Warning Buzzer/Chime Module: Warning Indicators; (Diesel Indicators); Gauges; Tachometer; Transmission Control Switch. |
| Fuse ATO 10A | 18 | Electronic Shift Module 4WD; Speedometer. |
Power distribution box
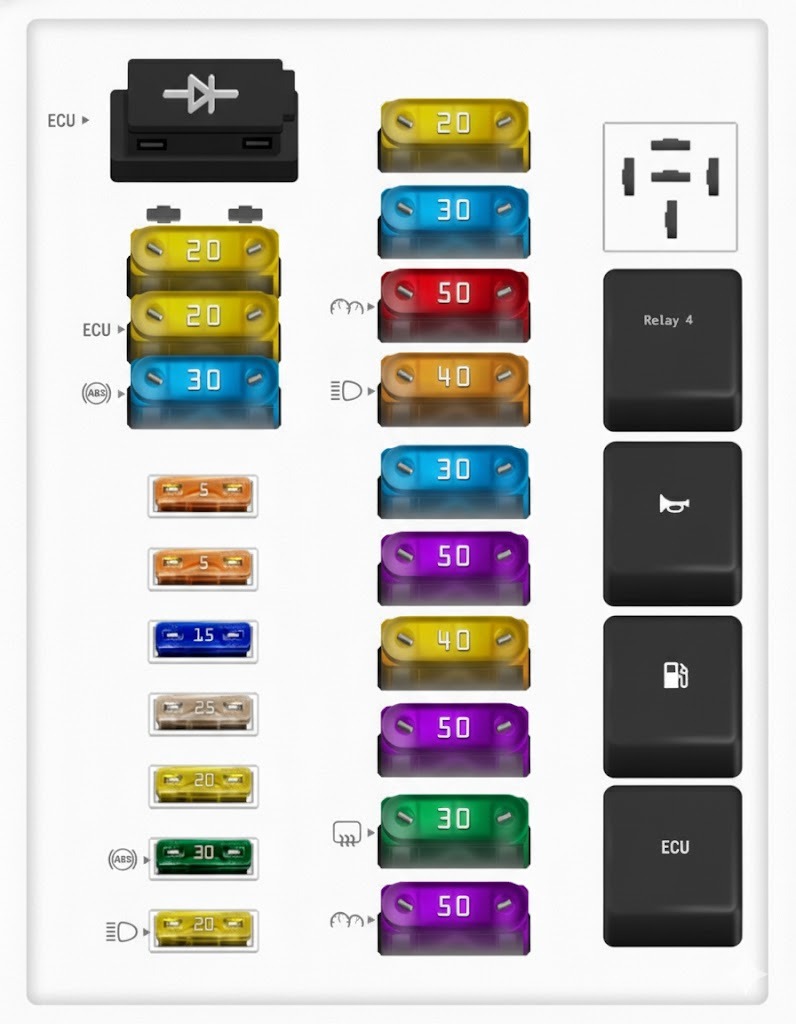
Tip: Some high-amperage fuses may look slightly different depending on the model year and trim. Always verify the fuse type before replacing.
Fuse Replacement Tips / Safety Precautions
- Always disconnect the negative battery terminal before removing fuses.
- Never replace a blown fuse with a higher amp rating — this can damage wiring or cause a fire.
- Use a fuse puller or needle-nose pliers for safety.
- Label replaced fuses for future reference.
Frequently Asked Questions (FAQs)
Why the Cigarette Lighter (Power Socket) Fuse Blows in an F-150
1. Current Overload
Plugging in high-power devices like inverters, compressors, or heavy chargers can exceed the socket’s limit, causing the fuse to blow.
2. Short Circuit
Damaged or frayed wires, or wires touching metal parts, can create a short circuit that triggers the fuse as a safety measure.
3. Faulty Adapters or Chargers
Cheap or defective adapters often draw too much power or have internal faults that overload the circuit and blow the fuse.
4. Incorrect Fuse Rating
Using a fuse with lower amperage than Ford recommends makes it more likely to blow during normal use.
What are Other causes of cigarette lighter (power socket) failure in the F-150?
1. Defective or Damaged Lighter
If the lighter or accessory adapter is worn out or broken, it may stop working properly. A damaged heating element or internal parts can prevent it from functioning.
2. Damaged Lighter Socket
The socket itself might be the issue. Worn, bent, or corroded contacts can prevent a proper electrical connection, making the lighter or device fail to power on.
3. Wiring Issues
Loose, damaged, or broken wiring between the socket and the vehicle’s electrical system can interrupt power flow, stopping the lighter from working.
4. Faulty Connected Device
Sometimes the problem isn’t the socket at all — a defective charger, adapter, or device can make it seem like the lighter socket has failed when it’s actually the accessory that’s faulty.